Bassinghamobservatory Posted July 25, 2016 Share Posted July 25, 2016 At the request of Tweedledee here is a description of the progress making Bassingham observatory a real observatory. We moved to Bassingham over 8 years ago attracted by a quiet rural location but not too far from civilisation my accountancy clients. It is a mile from the village where the nearest street lights are found so skies are reasonably dark but the glow above Lincoln and North Hykeham can be almost up to Polaris at times. When I started deep sky imaging I set 3 concrete blocks in the grass to take the tripod legs with metal brackets for secure location and that has worked well keeping good polar alignment between sessions. The snag has always been the setting up time so an observatory has always been on the wish list. It came to a head this spring when the lawnmower whipped out one the tripod marker brackets. I did not note the date I started work but the first delivery of timber was 5 June and the pier base was in by then. Please can someone let me know why an 81k jpeg brings up a message that only 512k can be uploaded. Then I will continue. Tweedledee 1 Link to comment Share on other sites More sharing options...
Brantuk Posted July 25, 2016 Share Posted July 25, 2016 Is it just a single pic in one post? Or is it several pics in one post and that's the last one that took it over the limit? Sometimes if you start a new post it merges everything into your previous post. That can exceed the limit too I discovered. Hth Link to comment Share on other sites More sharing options...
Bassinghamobservatory Posted July 25, 2016 Author Share Posted July 25, 2016 I was adding the first pic in this post. This time it has decided to work! Will continue this evening. Tweedledee, Smithysteve and Brantuk 3 Link to comment Share on other sites More sharing options...
Tweedledee Posted July 25, 2016 Share Posted July 25, 2016 Excellent stuff Graham, thanks for posting. Looking forward to more pictures and progress. Link to comment Share on other sites More sharing options...
Bassinghamobservatory Posted July 25, 2016 Author Share Posted July 25, 2016 Have added a few more shiplap boards this evening. But from where I left off. The pier footings were dug 2 foot sq and then tapered the base out another 6 inches. On the photo you can just see the old tripod leg markers and the new base just completed Rather than footings for the shed base I opted to use concrete blocks at each corner and make a substantial undercarriage from 6x2 timbers. The outside dimensions are approx. 8' x 6' which should leave lots of room for my ed80 and computer desk. Also leaves scope for something a bit larger, but don't tell anyone. The frames for the walls were put together on the garage floor and erected with the help of our nephew (visiting from Montreal). I have been pleasantly surprised how square it has gone up. Next for the cladding with shiplap boards. This is still in progress three sides now almost fully clad. I had miscalculated the quantity of boards required and ran out at the weekend. Just managed to phone in time to add more to the next order that arrived today. Whilst waiting I fitted the flooring in place but only temporary - need a roof first. The drain pipe will be the pier eventually but no concrete in it yet. The floor board near the door didn't quite fit but it should when they are all knocked in finally. That's it so far. There are more pics on onedrive https://1drv.ms/f/s!At85D9aim9G0gQpsL4wanDU-WPXW Tweedledee 1 Link to comment Share on other sites More sharing options...
Tweedledee Posted July 25, 2016 Share Posted July 25, 2016 Looks very professional. Link to comment Share on other sites More sharing options...
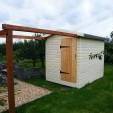
Bassinghamobservatory Posted August 3, 2016 Author Share Posted August 3, 2016 Here is an update on progress. Have given the shiplap boards one coat of Cuprinol Garden Shades, "fresh daisy". I wanted a light green but it is even lighter than I thought so it may be changed at a later date. At least it has helped to keep out the light rain we had recently. The roof rails were only fitted temporarily to fix the position of the supporting post and the other rail stretches across the path to the wall of the outbuilding. There is power in the outbuilding so I shall easily be able to bring a cable through and along the rails. The post has now been installed and concreted - quite surprised and pleased how firm it is. Note how close it is to a drain; in fact I had to move it to the inner side of the cross-rail to miss the pipe. The green bags on the tree are to stop the birds eating all of the cherries - they like them as much as me but will eat them before they are ripe! I shall still need to order more shiplap so I am leaving the door end until the roof is ready and I can work out exactly what is needed. Link to comment Share on other sites More sharing options...
Doc Posted August 3, 2016 Share Posted August 3, 2016 Nice one Graham, I think it's wonderful to have a project like this, it keeps your mind and fingers active. It looks really well done, you must have taken great care with all your measurements. Link to comment Share on other sites More sharing options...
Stephen Posted August 4, 2016 Share Posted August 4, 2016 Looking well made Graham Link to comment Share on other sites More sharing options...
Bassinghamobservatory Posted August 10, 2016 Author Share Posted August 10, 2016 Progress update no 3. The roof rails have now been fixed in place and given some fence paint. Then on Monday evening I had some help from a builder friend (another Graham!) I thought he was coming to help cut the roof timber angles with his circular saw table but he arrived with the roof trusses already cut. I had already purchased 8 wheels for the rolling roof and the first job was to attach these. They are fitted through holes cut in the roof side rails so that the roof is not raised up as much as it would be otherwise. The wheels sit on the outside of wall-tops with a vertical spar inside as guide rail to stop sideways movement. Perhaps I should take some close-ups of this. We just got the roof on by about 10.30 and was quite dark - and clear! Very pleased with how the roof rolls; one finger is enough, but it will be somewhat heavier when boarded and felted. Tweedledee 1 Link to comment Share on other sites More sharing options...
Bassinghamobservatory Posted August 10, 2016 Author Share Posted August 10, 2016 Limited space for photos so look here for more. https://1drv.ms/f/s!At85D9aim9G0gQpsL4wanDU-WPXW Tweedledee 1 Link to comment Share on other sites More sharing options...
Tweedledee Posted August 10, 2016 Share Posted August 10, 2016 Very nice job Graham. Looks like you have a nice rural outlook and I presume you have pretty dark skies. Does the roof roll off to the north? Link to comment Share on other sites More sharing options...
BAZ Posted August 10, 2016 Share Posted August 10, 2016 That's coming along nicely Graham. Link to comment Share on other sites More sharing options...
Bassinghamobservatory Posted August 19, 2016 Author Share Posted August 19, 2016 Progress update no. 4 The views of the wheel arrangements taken with the roof propped up. More to follow in a minute. Sorry but it is not letting me add more pictures. More on the Onedrive link. BAZ 1 Link to comment Share on other sites More sharing options...
Bassinghamobservatory Posted August 30, 2016 Author Share Posted August 30, 2016 Project update no. 5 I had just nailed the plywood roof on when the storms were forecast the other week and had to batten down the hatches. Large piece of dpm left over from another job did the trick. Will use this under the floor when it gets to that stage. Last Friday I took an extra day off work to get the roof felted with more rain forecast for the Saturday. Amazing how many nails you get through! All fingers escaped damage! First pieces on. And the ridge. Next to complete the shiplap boarding on the east end. The rest of the weekend was spent finishing the shiplap on the end and both roof gables and fascia boards over the felted gable ends. This was less than straight forward because they need to clear the runners when the roof opens and took quite a long time. So busy I forgot about taking pics but will do some this evening. As always extra pics on https://1drv.ms/f/s!At85D9aim9G0gQpsL4wanDU-WPXW Link to comment Share on other sites More sharing options...
Recommended Posts
Create an account or sign in to comment
You need to be a member in order to leave a comment
Create an account
Sign up for a new account in our community. It's easy!
Register a new accountSign in
Already have an account? Sign in here.
Sign In Now